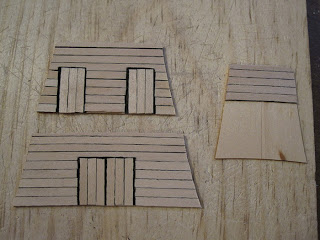
The laser-cut bulkhead for the main deck, with the doorframe highlighted with the archival pen and the 4 pieces cut for the door:
The first few planks in place:
All of planks glued:
Sitting on the deck after trimming the planks (it will be glued after some more details have been added and it is stained):
Three of the other bulkheads, almost ready for staining:
Treenails added:
One of the bulkheads has a window, which I added after that bulkhead was all stained.
To create the window, I cut out a small rectangle slightly larger than the window opening from a sheet of acetate. Then, using very thin white pinstripe tape (maybe 1mm wide?), I created a diamond pattern, which I framed with slightly wider tape. While doing this, I repeatedly checked it against the actual hole in the bulkhead to make sure the frame and pattern looked good. Once satisfied, I used some wood glue to attach it to the back of the bulkhead.
Before attaching the bulkhead to the deck, I painted around and behind the hole where the window would fit black so the window would stand out a bit more.The finished bulkhead:
As you probably noticed, I also created hinges for this and all of the other doors. These were created by taking an index card and cutting it into appropriately sized strips. I then added little dots of glue to simulate the rivets and then painted all of the strips black after the glue had dried.
All of the hinges attached (I later did some touch-up paint to fix a few areas):
Gluing the bulkheads to the deck:
With the bulkheads attached, I then went about making the handles. These were made by taking some brass eye bolts, bending the ends and then painting them black.
The final step for the bulkheads was to create the 2 ladders for the forward cubbridge head (the bulkhead against the forecastle). This was just a matter of cutting out the parts, sanding/staining them (I used Minwax Puritan Pine), then attaching them to the bulkhead (I actually did this before attaching the bulkhead).
The poop deck bulkhead:
The Great Cabin bulkhead:At one point, while waiting for the stain to dry, I created and attached the rings for various spots on the deck. For the rings, I took a length of black chain I had left over from another model and separated a bunch of the links by gently prying them apart. These were then attached to some more eye bolts.
Using the Dremel, I re-drilled the 2 holes in the hatch cover (they had been filled by the stain), trimmed the eye bolts so they weren't so long, and then glued them in place.
After gluing the main hatches to the deck, I drilled 4 holes for each (2 per side) then trimmed the eye bolts and glued them in place. I was careful when gluing them in place to ensure the rings themselves weren't glued to the deck, as I will need to use them much later when I add the ship boat to the deck.
The backside of the forward cubbridge head, with some planking added and stained:
One final shot with all of the bulkheads attached and the ring in place (you may also notice I've attached the stern bulkhead):
Next up is adding the sides to the top part of the ship... I've actually completed that step, but I'm a little behind on this blog so you'll need to wait 'til I get the pictures organized...


No comments:
Post a Comment