Now that the hull is all planked and sanded, it is time to move on to the decking while I can still easily access it. Once I start building up the sides of the ship, it would be much harder to do this as access will be limited.
First thing is to clean-up the work area, since it was a mess from all of the sanding when putting on the hull planking.
Before adding the actual decking, I need to build 2 hatches for the forecastle deck (at the bow of the ship), one of which will be just a frame surrounding the opening in the deck above the eyebolt I installed while adding the bulkheads. Then on the upper deck (i.e., the main deck), I need to build a Capstan base and the main hatches. The Poop deck (at the stern) has no hatches so it can just have the decking applied as is.
The easiest of these things to build was the Capstan base, which is just 4 short strips of wood glued together to form a square. Later I will need to build the actual Capstan, which is used on sailing ships to apply force to ropes, cables and hawsers (thanks Wikipedia!).
To better highlight the (planned!) gaps between the planks once they are glued together, I used a black archival pen to colour one edge of each plank; I'll be doing the same to all of the decking and wherever else I do planking. I could have done the same with the hull, especially since I am likely not going to do a second layer of planks, but it will be painted anyway, so there was no need. If you recall, I tried to do the same thing when planking the counter, but didn't have much luck using just a pencil, so have since bought an archival pen (the ink used doesn't "bleed" like if I used a regular marker) which has worked much better.
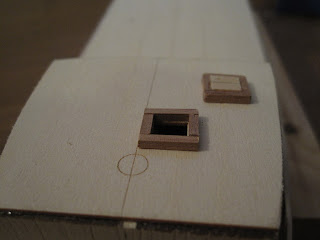
I next created part of one of the hatches for the forecastle deck, doing the same thing; this time I also installed a frame around it using some dark wood I had left over from another kit (to add some contrast). Lastly I used the tip of my knife to poke 2 holes in the center strips - later I'll use the holes to install handles which would have been used to lift the hatch out of the frame (it was for a galley stack which they removed when not in use).
just sitting on the deck (I re-did it to fix the angle on that right plank):
just sitting on the deck (I re-did it to fix the angle on that right plank):
I added a couple of tiny strips to the bottom to raise the hatch slightly above the top of the frame):
That done, I created the framing around the eyebolt hole on the forecastle deck.
Partially completed hatches (not yet glued to the deck):
Partially completed hatches (not yet glued to the deck):
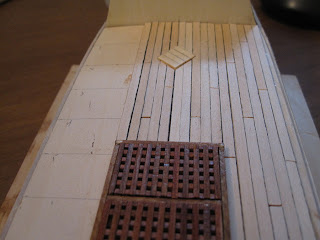
The last pieces of decking to create at this stage were the main hatches, which is made up of 3 grates and the frame around them. To create the grates, there were a number of notched strips provided with the kit which needed to be cut to size and put together. That sounds much easier than it was! They are so small and fit together so tightly that I broke the teeth on a few of them after I had cut them to size.... plus lining all the notches up was a bit of a challenge. Still, they were easier than building the frame... cutting the parts to the exact lengths and keeping everything square while gluing it together took a bit of work. Not to mention making and attaching the really tiny strips of wood that needed to be glued to the bottoms of each strip to provide a ledge for the grates.
Trying to get the correct lengths for the frame (these ones didn't work):
The outer framing in place, with tiny ledges added along the bottom to raise the actual grates:
The frame completed and the grates just sitting in their spots (I had to cut the ledges before installing the cross-pieces, which also had ledges):
In the process of staining the frame (I used Golden Oak):
The final, unassembled main hatches (I forgot to take pictures of it all together, but there are some later with it sitting on the deck):
With the decking pieces all done and mostly glued in place (I haven't installed the main hatches yet, as I am staining them while they are off the model - 2 layers of Golden Oak for the frame, then all the pieces covered in a couple layers of Polyurethane - which takes a bit of time since you have to wait quite a while between layers), I began on the actual decking.
The easiest is the Poop deck at the stern, as there are no hatches to cut around. This simply involved cutting the required number of strips to length, highlighting one edge of each plank and then gluing them in place. Once the glue had dried, I sanded the entire thing with 100 grit sandpaper, followed by 220 grit, then stained it.
The decking on the left had their edges coloured, while the ones on the right have not:
The decking on the left had their edges coloured, while the ones on the right have not:
All the decking installed on the Poop deck (I just noticed the plank to the far left isn't quite long enough - it'll be covered in the final model so I'm not going to worry about it):
Sanded:
Stained:
I was originally planning to use the oil-based Natural coloured stain that I had tested (see one of my other blogs), but since then I had picked up some water-based, wipe on style stains which looked good when I tested them, so I ended up going with an Oak colour (MinWax Express Colour). It turned out pretty good - the little blotches and other flaws are likely due to my sanding job and little areas of glue which had soaked into the wood when installing the decking. All-in-all, I'm happy with it for my first real attempt at staining a deck. Of course, it wasn't 'til after I had everything stained and a coat of Polyurethane on it that I realized I forgot to try to do the treenails (wooden pegs used to hold wood together)!
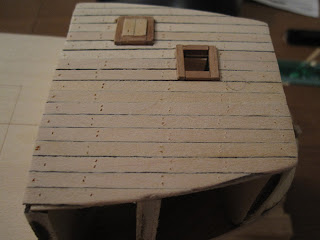
The forecastle deck was next, and it was fairly easy to lay the decking there as well, even with the need to notch some planks around the hatches. After they were all glued in place and dry, I tried my hand at adding the treenails. Reading on the various forms, there are various ways to do these, such as creating actual wooden "nails" and adding them to the deck by drilling holes for them... or the way I did them, which was to poke holes in the deck with the tip of my knife and fill them with dark wood putty so they would stand out. Considering there needs to be hundreds of these for various parts of the ship, it shouldn't be a surprise that I went with the second option for my first attempt... maybe on another ship I'll try the other way. Again, they didn't turn out too bad for a first attempt.
Initial decking (obviously I'll need to trim the edges):
Initial decking (obviously I'll need to trim the edges):
Treenail test on some scrap wood:
All the holes:
Walnut putty used to fill the holes:
All of the holes filled and the mess I made when doing them cleaned up:
The final stained Poop deck:
All the holes:
Walnut putty used to fill the holes:
All of the holes filled and the mess I made when doing them cleaned up:
The final stained Poop deck:
With everything in place on the forecastle deck, I sanded and then stained it. It was trickier to do this one since I had to work around the hatches with the cloth, but I think it turned out okay - not as good as the Poop deck, but it still looks a lot better then the previous models where I had always simply painted the deck. I think when I get to the point of doing the main deck, I'll use a sponge brush instead of a cloth, at least to get around the Capstan base. I haven't decided yet if I'll glue the main hatches before doing the decking or after (and notching the decking out around where the hatches will go). It would be easier to stain without them attached, but I'm not sure how close I can get the notches without them permanently in place.
Also, for the main deck, the decking will be slightly different then the previous 2 decks. Those ones basically just used a single strip for each length of the deck, but because the main deck is longer, it will have a pattern to the way the deck is laid - each length of the deck will have 2 or 3 shorter strips, with the ends being in different spots in each length.. that will make more sense once I start doing it and post some pictures... For this piece I'm following a tutorial by Ulises Victoria, which is available on Model Ship World, a great modelling site.
First thing is to decide how long to make each strip of planking. While the instructions included with the kit are the best I've seen and I will have no hesitation doing another kit by Chuck Passaro, there are a few very minor details so far that would have been nice to see included, such as how long to make each strip. There's probably a "proper" way to determine the length, but I just eyeballed it by placing some scrap on the deck and seeing what looked good to me. So I'm going with 90mm strips which, for a full row, would mean roughly 2 strips would run the length of the main deck (it's about 185mm long).
Since I've decided I already want a pattern that repeats every 5 rows, I divide the length of each strip by 5 (90 / 5 = 18mm), then mark lines at that width along the length of the deck and number them from 1 to 5; these will be used to determine the start point of each strip (who thought there would be so much math involved in building a model!).
The lines drawn on the deck (you can see the staining accident I had... the stuff I'm using is in a tube, and when you squeeze it, it goes where it wants, not where you're aiming...):
One way to lay the decking would be to have the first strip start at line 1, then the next at line 2, etc. This looks fine in the examples shown, but I'm going to follow the recommendation in the tutorial which will use the repeating pattern 1 3 5 2 4, where the numbers represent the line each row starts at. The end result looks much better using that pattern, at least in his pictures... It's the same amount of work either way (e.g., notching/cutting around the hatches and Capstan base, colouring the edge of each plank, etc.) - I just need to ensure before gluing each plank that I've got it lined up with the correct line.
The first plank to lay will be the one to the right of the centre line, which will start at line 5 (the bulkhead towards the bow). Once the full length along the centre line is in place, I'll alternate sides. I'll attach the first row with CA glue to form a quick/strong bond, and use white wood glue for the rest of the rows.
I've also decided that I am going to do all of the decking before I attach the main hatches. This will make it much easier to sand and stain the deck, although it also means I'll need to be a bit more careful with cutting the planks to minimize any gap between them and the hatches.
I fixed the crooked strip later:
As you can see in the pictures below, the decking turned out okay, with just a couple minor issues: the width of the spot for the main hatches is 1-2 mm too wide (I'll center the hatches so it won't be noticeable unless your looking for it, especially once the rest of the ship is done and there is rigging everywhere); the shading on the edges of one of the planks is a little too noticeable (hopefully sanding will take care of this); and I didn't quite have one of the planks perfectly straight so there was a slight gap between it and it's neighbour at the bow (I had used CA glue on that one and didn't notice 'til after it was dried and I was working on measuring the other planks - I was able to pry it up, tho, and straighten it so it is not as noticeable).
Next up is creating the ~500 treenails... 24 rows of planks x 11 of the pattern lines x 2 treenails at each spot... of course it will be fewer than that since I don't need to do them where the hatches are or the Capstan base, but I'll need to do 4 everywhere 2 planks butt up against each other. Once those are done, everything will be sanded and then stained.
Treenails all done (I should have slightly offset each pair like I did with the Poop deck...):

Staining the deck (after a coat of Pre-Stain Conditioner, which I didn't use on the other 2 decks - hopefully it'll resolve some of the blotting issues):
Top-down view with everything stained. Now it's just a matter of doing all of the various coats of Polyurethane, then attaching the main hatches):
At this point, I've determined that I'm still nowhere near as good a modeller as the folks on the forums I'm using for reference... so I'm going to settle for simply doing a better job than with my previous ships and enjoying the experience (so far I am definitely succeeding)! At some point I'll post pictures of them so you can see the difference in quality - they're not terrible, but I can definitely see the Mayflower is looking much better than they ever did!


No comments:
Post a Comment