As usual, it was again time to clean-up the work area a little bit before starting on the next phase:
Before staining the hull, I started on cutting, painting and staining the various strips of wood that will form the trim work.
The wales. These will be painted black and one will go above the cannon ports and one below the cannon ports on each side; all 4 were curved at one end to go around the bow.
Priming the wood, which is basically just painting them with a thin coat of primer before doing the final painting. The first layer generally soaks into the wood a bit, so by giving it a primer coat first, the subsequent coats will look better.
The wales and some of the other trim work all primed:
With everything primed, I began to paint the trim work... Some is just painted white (the top strips), the wales are black (the bottom strip), a couple are just red and some of the trim work is patterned (white and red, or white and green).
In between painting all of the trim work, I moved on to preparing the hull for staining and painting.
The first thing would be the stain, so I used masking tape to block off the areas that would later be painted as there is no need to stain those (I changed the tape in the top picture after this so that the strip of green tape matched the bottom picture):
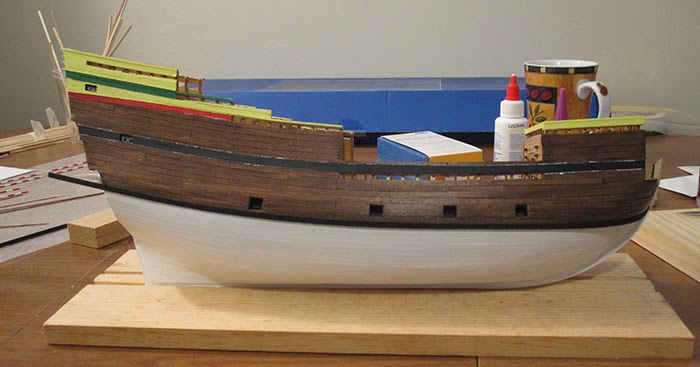
Dreading the results (after my experience painting the stern and the glue blotches), I finally went ahead and stained both sides, using pre-conditioner and 2 layers of Colonial Walnut Wood-sheen. I was actually pleasantly surprised with how it turned out! There are a few minor blotches, as you can see in the pictures below, but nothing major like on the stern!
 Holding one of the trim strips against the stained hull - looks pretty good.
With all of the tape removed:
After the stain had a chance to try (a couple of days, I think), it was time to tape everything up so I could start painting the hull:
 As with the trim work, I first applied a primer coat to everything that would be painted:
Speaking of the stern, I should have paid better attention to the instructions and pictures... after the problems with staining the stern, I ended up painting over the top part (after first sanding it). This is where some of the trim work will wrap around the stern.
The first bit of painting is the black strip along both sides, which included painting the inner part of the window black. You'll notice there is some white above and below the black line - this is where the tape wasn't quite perfect. Some of the trim work is going to run above and below the black strip, which will cover the white, so I am not worried about it.
The forecastle railing - as with the stern, I had to sand the stain off the front and back rails so I could paint them a matching yellow (FYI: the colours used are the ones recommended in the instructions, and with the exception of the black, are the paints that came with it when I bought the model - I think the black that came with it looked too grey).
The aft part of the ship will be a mixture of colours - one strip of red, then one of yellow, one of green and then the rest will be yellow. Also, the minor imperfections will be covered up by the trim work.
As with the trim work, I first applied a primer coat to everything that would be painted:
Speaking of the stern, I should have paid better attention to the instructions and pictures... after the problems with staining the stern, I ended up painting over the top part (after first sanding it). This is where some of the trim work will wrap around the stern.
The first bit of painting is the black strip along both sides, which included painting the inner part of the window black. You'll notice there is some white above and below the black line - this is where the tape wasn't quite perfect. Some of the trim work is going to run above and below the black strip, which will cover the white, so I am not worried about it.
The forecastle railing - as with the stern, I had to sand the stain off the front and back rails so I could paint them a matching yellow (FYI: the colours used are the ones recommended in the instructions, and with the exception of the black, are the paints that came with it when I bought the model - I think the black that came with it looked too grey).
The aft part of the ship will be a mixture of colours - one strip of red, then one of yellow, one of green and then the rest will be yellow. Also, the minor imperfections will be covered up by the trim work.

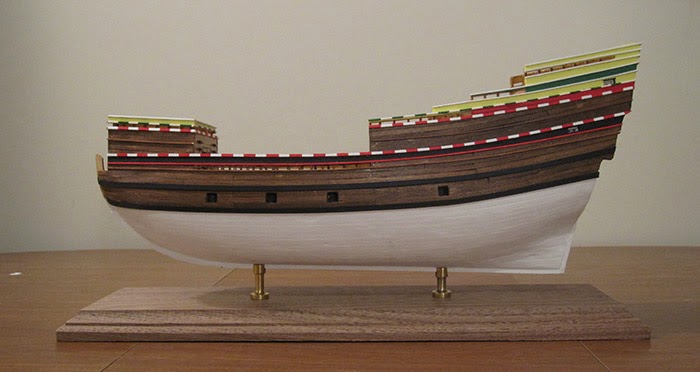
 And that's as far as I've got so far, at least in pictures. The green strip is done (which is the first one to wrap around the stern), so once that has dried I will do the rest of the painting. I will probably also paint the bottom of the hull white (it currently just has a coat of primer) so I can attach it to the stand before I start adding the trim work.