Monday, 2 September 2013

Planking the Hull (1st Layer)

With the stern finished (for now), it's time to move on to one of the more difficult processes of a wooden ship model, at least for me: planking the hull.
 
For the Mayflower, there will be a double layer - 1 layer added to the bottom of the hull now (which will cover the gun ports I did), and then a second layer added to that layer and to the top of the ship later on.  It is done in these 2 stages so that it's easier to get at the decks without the top part of the ship planked yet; the 2nd layer is done all at once to ensure consistency.
 
Because this is the first layer, it will be more forgiving then the final layer.  I will try my best, obviously, but if I end up with some gaps I can always use wood filler since it won't be visible in the finished model.
 
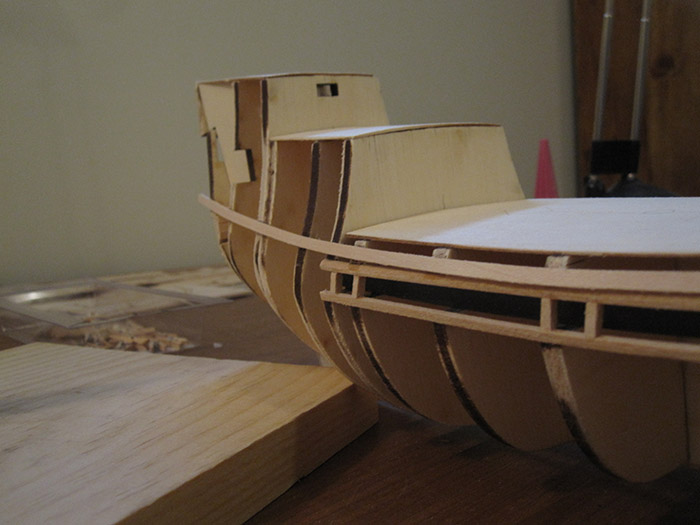
The first step was to draw the reference line on both sides of the ship - everything below that line will get the 1st layer of planking at this point.
 
The bulkheads did have lines etched on them to act as the reference line, but as these can (and did) get slightly out of alignment when the bulkheads were installed, it needs to be verified and redrawn where necessary.  Luckily the kit comes with 2 templates to form the upper part of the hull - these were held in position while I redrew the lines on both sides.  This line will be the top of the initial plank, which will be above the gun ports.
 
 
According to the instructions, I'll need 12 planks to do this first piece, each of which needs to have the last 3 inches on one end tapered from its full length to 80% of its width, so from 3.2mm wide to 2.6 mm.  Not just one strip, but all 12 (and it looks like all the rest as well)... what fun...
 
Surprisingly, I got those first 12 done and only broke 2 strips (which can be salvaged for use elsewhere, like between the gun ports).  I doubt they are exactly 2.6mm wide, and that the taper is perfect, but they look to be fairly close!
 
With those all cut, I threw them in hot water in the bathtub so they will be easier to bend to fit around the bow of the ship and curve as they run towards the stern.
 
After probably 30 minutes, I retrieved the 1st strip and went to work with my electric plank bender (looks like a soldering iron with a piece at the end which heats up - this is run along the wet wood to achieve the desired bend - it heats the water which becomes steam which allows the wood to bend... or something like that...) to get the shape I needed for the bow.  Satisfied with the 1st strip, I did the same for a 2nd one so I could install this initial plank on both sides - you should alternate sides so the planks don't twist the hull out of shape.
 
Electric Plank Bender (it's hanging so the heated end isn't sitting on the table... I don't have to use it in that position):
 
 
Next it was time to install the planks...
 
I did the port side first, using 2 different types of CA: one that bonds in 5-15 seconds and one which bonds in 10-25 seconds.  This is so I would have enough time to apply the glue to the bulkheads, attach the strip and still have a few seconds to maneuver it into place.  I did this in stages rather than try to glue the full strip on at one time (i.e., glued it to the first few bulkheads, then the next and then the stern, making sure that the curve was good for the next set of bulkheads so it would have the correct curve all along the hull). 


It went smoothly except for attaching it to the bow, where the glue just wouldn't stick for some reason, no matter how I held it.  Finally I pulled out a bottle of Insta-Cure (it came with the glue - I didn't think I'd actually have to use it, tho) and, with the plank glued to the bow, sprayed it.  Worked like a charm!  This strip didn't quite go far enough, tho, so there is about a 2mm gap at the bow which I'll need to fill in later.
 
With the port side in place, I did the same for the starboard side plank.  Unfortunately, I didn't quite have the plank lined up at the bow, so it doesn't have the same smooth curve at the bow as I got on the port side.  I tried to use the Un-Cure which also came with the glue, but it didn't break the glue bond, so I'll have to figure out a way to fix it.  Luckily this is only the 1st layer, so whatever I do won't be visible on the final model.
 
 
Except for the mishap at the bow, I'm happy with the way the 2 strips turned out.  There are a couple of spots where I didn't quite have the bulkheads beveled correctly (they were close, tho), but I can hopefully correct these before installing the rest of the planking and then sand the problem parts of these initial strips to they lay flush.
 
I also don't think the rabbet strip I installed waay back is thick enough, at least not at the bow.  It is supposed to be deep enough to take the thickness of the planks, but it only seems to be half that thick.  This is only at the bow, so I will probably just add a small filler plank to bring it up to the correct height.


After a bit of a break, I came back and finished up the next 5 planks on both sides (as per the instructions).


It doesn't look too bad (compared to my other models, that is... it's no where near as good as some of the other ships I've seen...).  It'll take a fair bit of sanding to smooth things out, plus some wood filler in a couple spots - and I need to file the port holes to get them back to their square shape - but I'm fairly pleased with the end result (as long as I remind myself it won't be visible on the finished model... as long as I get it smooth before applying that layer, it should be okay).


Next up is to add another band of planks below this one, then move to the bottom and work my way up (so probably 3 more bands of planks per side - I'll measure it tomorrow and figure out how many planks per band... probably 5 or 6).


Planking Below the Counter

After sanding the stern port lids to square them off of a bit better, I began to apply the planking layer below the counter.  Unlike the counter, these planks are placed diagonally, and cut out around the port lids.
 

I was a bit nervous about this step, but I think it turned out good.  There are a few small gaps which I'll need to fill with some wood filler once the glue has dried, plus I still need to trim the outer edges and the center run where the rudder will go, and finally sand it all down, but all-in-all I'm happy with how it turned out.

Once that is done, the stern will be done for now.  The rudder, upper transoms (where the windows are) and painting all come later.

Next up, the first layer of the hull planking.  This is the part that tends to take the longest, usually with a break of a few months/years between when I start and when I finish... it doesn't actually take that long - I just tend to get tired after doing this after a while t and set it aside... this time I plan to stick with it until it's done!

FYI: For taking the pictures, I'm using the Macro setting on my camera which really tends to make problem areas stand out.  For example, the gaps between the planks look worse in the pictures than they do to the naked eye.  The plus side of this is that I can see and try to fix these minor imperfections...

Sunday, 1 September 2013

Experimenting with Stain

Unlike previous models where they were mostly painted, with some wood left bare, this time I want to use a mixture of paint and wood stain.  It will be awhile before I am ready to do any actually staining on the Mayflower but, since I've never done any staining before, after a bit of reading on some model ship forums, I was ready to experiment.

First, I found a bunch of scrap wood from previous kits and created some simulated decking and hull planking.  For the small decking section, I also marked one edge of each piece using the edge of a pencil before gluing it in place - a trick to make the deck lines stand out.  I'm not sure if I'm going to do this on the hull planking when the time comes, so I just glued those pieces in place without doing anything special to them.


With the glue dried, I next sand each piece with 100 grit, and then 180 grit sandpaper (the higher the grit, the finer the sandpaper - depending on what grit you use, the stain would "behave" differently, supposedly looking better with the finer grit).  After the 180 grit, I did 3/4 of each piece using 220 grit, then 1/2 using 320 and finally 1/4 using 400 grit (so the 400 grit had previously been sanded using 320, 220, 180 and 100).

For the decking piece - since it is short - I did it up to 220 for 1/2 and then up to 400 for the other half.

With the 3 pieces ready to go, I began the actual staining process (the following all used Minwax oil-based products).

I brushed pre-conditioner to the top half of each section, leaving the bottom half the plain sanded wood.  I think the pre-conditioner opens the pours in the wood, so the actual stain adheres better and reduces blotches in the finished product, but I wanted to try both methods to see the difference in the finished product.

Following the instructions, I used a paint brush to apply the pre-conditioner, left it for about 15 minutes then wiped any excess that was left with a lint free cloth.  There wasn't really anything left to wipe up - did I maybe put it on too thin?


Next I stained 1 piece with Golden Oak, 1 with Puritan Pine and the decking with Natural.  I also had a 4th stain - Ipswich Pine, but I didn't think to create a 4th piece of scrap 'til after I was finished sanding, so I simply used a piece of wood to stir that and set it aside (so it had no sanding or pre-conditioner).

After letting them sit for about 10 minutes (the instructions say 5-15 minutes - the longer it sits, the deeper the stain adheres), I can't really see a big difference...  maybe I didn't sand enough using each type of paper, or maybe I put too thin a layer on (or both)...  I am going to apply a 2nd layer of stain and then use Polyurethane for the finish, but if that doesn't significantly alter the appearance, I will likely go with 220 grit for the hull planking and use the pre-conditioner.  For the decking, I'll use 320 and the pre-conditioner.

Natural:
 
Puritan Pine on top, and Golden Oak below:
 
Stir sticks (from left-to-right - Puritan Pine, Natural, Golden Oak, Ipswich Pine):

For the colours, Natural looks good for the decking, and I think I'll use Puritan Pine for the hull (fitting, considering it's the Mayflower I'm building) and any other dark wood on the ship.  Ipswich Pine is a nice in-between colour - not too dark and not too light - which should be good for any other wood.  Golden Oak is fine, but too golden...

After 2nd coat (from top-to-bottom - Natural, Golden Oak, Puritan Pine):
 
 
After 2nd coat (from left-to-right - Puritan Pine, Golden Oak, Natural):


After the Polyurethane (the finish - not really much difference that I can tell, other than it is shinier and better protected):


Some additional test using MinWax Wood-Sheen and Express (2 water based products).  These were both applied by squeezing stain from the containers onto scrap wood and then wiping with a cloth (the above tests were all done with a brush).
 
MinWax Express (Oak) - 1 application, no sanding or pre-conditioner:

MinWax Wood-Sheen (Colonial Walnut) - 2 applications, no sanding or pre-conditioner: 
 

These both seemed to turn out quite well, but I'm not sure how easy it will be to apply them to the actual ship... When you squeeze the bottle it comes out in a blob which you then wipe into the wood (the Express seemed to be more of a liquid, so was a bit messier than the Wood-sheen).  That worked fine on this simple test strips, but it would be harder to get right when trying to work in small areas...

False Decks and Planking the Counter

After taking a bit of time to sand down the bulkhead bevels a bit more to clean up the rough edges, I moved on to installing the false decks (seems like an awful lot of "false" parts to this model...).  The false decks are thin strips of wood that will be used for the foundation of the deck planking, which I will eventually have to do one plank at a time...
 
Three out of the four false decks fit pretty good - I had to sand a smidge off one so it would line up properly, and one seems a little too thin (i.e., not quite wide enough to span the stern), but I can cover that up when I put down the decking.

The fourth false deck - the main deck - didn't quite fit because the keel is still a little warped.  But after a bit of sanding (maybe 1mm altogether off the edges - the warp isn't that bad), it fit smoothly.
 
 
Looking up through the eyebolt hole.

With the decks in place and after a bit of sanding on the sides to make sure they flow smoothly into the rest of the hull fairing, I began to work on the first bit of planking - the counter.  I'm not 100% sure what a counter actually is, but for the purpose of this model, it is a section on the stern.

This area should have 2 layers of planking - the first to raise it from the stern frames to be flush with the bottom piece, and then the 2nd layer covering the counter and the bottom stern piece.  Almost everything else done so far will eventually be covered by planking or decking - this 2nd layer of planking will be the first large section that will be visible on the finished model.

Because of the issue with not having the bulkhead quite down far enough, I had to add a 3rd layer underneath so that the 2nd layer would be flush with the bottom piece of the stern.  I just used some thin scrap wood I had left over from one of the other models.

With the first 2 layers glued in place, I next cut out the area where the tiller will eventually go.  I did this by drilling a number of small holes where it should go (based on the plans), and then using some files to widen and shape the hole.


Once the glue had dried on those 2 layers, I trimmed and sanded the edges to match the rest of the hull bevels (i.e., for the smooth running of the planks), procrastinated for a bit, then sat down to do the final layer.

Rather then bend the bottom plank, I decided to make the curve to match the top of the bottom stern piece by shaving off wood from a straight plank.  If that hadn't turned out, I would have soaked a strip of wood in hot water and then bent it to fit, but the shaving did turn out good so with a few drops of CA, I glued it in place.
The next plank up passes over the hole for the tiller.  I wasn't sure how to best to this (given my skills) - cut separate pieces for either side?  Put a full piece in place and then cut it out later?  Notch out a 3mm x 16mm section from a 3.2mm x 65mm strip?  Since the kit comes with extra wood (I hope!), I opted to try the last option first.  Surprisingly, I was able to notch the piece out without breaking the wood!  It's a bit smaller than I need, but a quick pass or two with a file after its glued in place will fit that.

The rest of the pieces in the counter went on with no problems; I did have to shave the top strip slightly, but that went easily.  The first and last strips used CA, but the other strips all used wood glue.
I did try darkening the edges of each plank with a pencil to simulate the caulking, but it did not turn out as good as I hoped (i.e., not really dark enough to make a noticeable difference - doesn't look bad, just not that dark).

Next is to plank the bottom section of the stern, starting with the 2 port covers, which went on with no problem.  After they dry, I'll need to trim the edges to make them a bit more square before I do the rest of the planking in that section.


Everything below the counter will eventually be painted white, so no need to try the caulking on the port covers or the rest of the stern below the counter.