Thursday, 26 December 2013

Deck Details - Ladders and Pumps

Ladders
There are 3 ladders that needed to be built - 2 from the main deck to the Quarter Deck, and 1 shorter one from the Quarter Deck to the Poop Deck.  They all needed to be built from scratch with the provided wood (i.e., they were not laser cut), but the plans came with scaled templates to follow.
The sides of each ladder were made out of a slightly thicker wood, and shaped so they matched the templates.  Then, on one side of each side, notches were initially cut out to take the steps:
 
 I then took a file and widened the notches to match the thickness of the wood used for the steps:

I originally cut all of the steps to length, but when the time came to stain them, I went back and used some longer strips which I again cut after they had been stained.
The sides, stained using Plantation Walnut - the steps were simply stained using a Natural stain:
 
Gluing the pieces together (the top 2 steps would later be trimmed so they would lie flush against the bulkheads).  As per the instructions I glued all of the steps into one side first, then after that had dried, attached the other side.


The ladder leading to the Poop Deck - not perfect, but not too bad:

Glued in place: 
The ladders to the Quarter Deck, glued in place.  The bottom steps turned out pretty good (i.e., straight), but the top ones didn't quite work out (it's much more noticeable in the picture, like all of my mistakes...).  I'm still debating whether to go back and try again, or just scratch it up to a lesson learned for next time I do ladders.
 

Pumps
The next pair of deck details are 2 pumps which go on either side of the main mast (presumably used to pour water on the nearby ropes so they don't get too hot when raising or lowering the sails).

The first step was to take a wooden dowel and file/sand it so it has 8 sides; once done, it was cut into 2 equal lengths (one for each pump):
The brackets and handles:
 
The spouts and painted eye bolts:
 
It's hard to see, but the tops of each of the brackets had a narrow slot cut into them, into which will fit the handles.  I think I only broke 2 when trying to create those notches...
 
Everything stained Plantation Walnut, except the main barrels, where I just used a Natural stain.  You can also notice the tops of the barrels have their centres slightly carved out (and later painted black) to accept the end of the eye bolts.
 
Two bands for each of the barrels - they would have been metal on the real pumps, but I used some of the tape left over from the windows which I painted black; the instructions suggested black tape (I didn't have any) or heavy paper.
 
The pumps completed and in place (and yes, this knight head is supposed to be offset slightly from the mast).  You might notice the handle of the left-hand pump is different then the right-hand one.  It was quite difficult to get the eye bolt through the hole - I must have broke half a dozen pieces trying to get it to work...  So finally I got one that worked and, rather then trying to shape the handle again, I just went with a simpler shape.  I probably should have done the same with the other pump so they matched...  


Tuesday, 24 December 2013

Deck Details - Knight Heads and Railings

Knight Heads
These are 2 pieces which will be placed on the deck and used for rigging related to 2 of the masts.  Liek the kevels, the kit came with metal castings that could be used for these, but I decided to try my hand at making wooden ones instead.

After drilling 4 holes in each one, I cut them to length.  There are supposed to be 6 holes, but I couldn't drill that many without breaking the wood.  Plus, the metal castings that were included with the kit didn't have the full 6 holes either... they only had a couple, and they didn't even look lined up...
I next created little notches running between the holes and coloured them black with an archival pen.  I also created a notch around the tops and smoothed the edges a bit:
Some pieces ready to be stained:
Painting some eyebolts and cleats:
 
 
Putting it all together:
 
 
One of the knight heads attached to the deck.  The bottom of each one was angled slightly (based on the plans) so that when they are attached they will be slightly tilted towards the stern of the ship.  When the masts are finally attached, they will have the same angle - the one in the picture is just sitting in the hole at the moment.
Railings
Both the Poop Deck and Quarter Deck need railings (you can actually see the Poop Deck railing in the above photo).

The railing for the Poop Deck is actually fairly straight-forward - 3 uprights (stained Plantation Walnut) and a railing (painted white):
 
 Test fitting the pieces:
Gluing the uprights in place (I really need a way to ensure they are straighter...):
 
 
In the above picture, I actually had the railing too high, so I detached it, trimmed it a bit and re-added it (still not straight!!  Arrghh!):
 
The Quarter Deck railing was slightly more complicated, as it has a belfry in the centre.

The railings and centre crossbeams were intentionally cut wider than needed - they'll be cut to the appropriate size once I start assembling it.

Also, one of the crossbeams has a small hole drilled in it - an eyebolt was attached to the bell, then the extra was trimmed off so that it would fit through the hole and the bell would hang down slightly.
Once everything was stained, it was time to put it all together.  The belfry was mostly created off the ship, so I was able to get it fairly straight.  The tops of the 2 side pieces are actually cut at an angle, which will be used for the roof.
 
The belfry and all of the uprights attached to the deck (I still need to work on getting things straighter...)
 
 
The railings attached:
 
The roof added to the belfry:
 
Almost completed - the last thing I did, which I forgot to take a picture of, was add a little strip across the top of the roof.  There was a little gap where the 2 sides came together, which the strip covers up.


Deck Details - Kevels and Pin Rails

This and the next post are going to be a smorgasbord of the various deck details, including kevels and pin rails, knight heads, railings, ladders and pumps.  These were all created at the same time, and attached to the deck once they were all ready, but I've grouped the images by type below.  Some turned out better then others... I'm not overly happy with how the ladders turned out, so might re-do them...

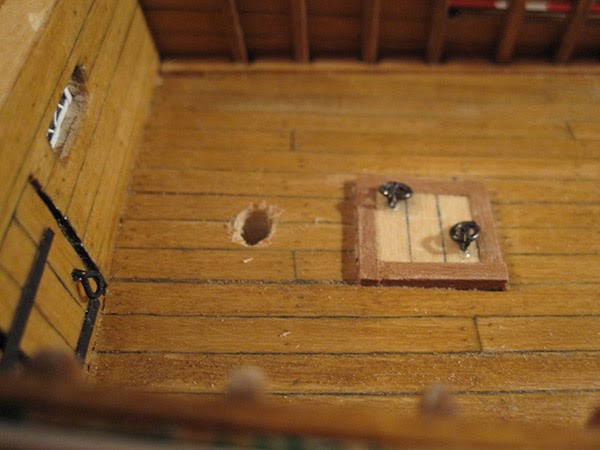
First up, some pictures of the mast holes I had drilled earlier (the 1st photo also shows the hinges attached to the hatch on the Quarter Deck):
 
The kevels and pin rails will be attached to the inner hull, and are used for attaching the various rigging .

The kevels are basically sturdier 'V'-shaped versions of pin rails, I think.  The kit came with metal kevels, but the instructions suggested creating them from scratch, so I did.
 
 
The completed and stained kevels, after I used some wood filler to fill the gaps between where the wood fit together:
 
The hardest part of the pin rails was drilling all of the holes for the belaying pins.  As you can see, it took a few tries to get it right...
All of the pin rails drilled and cut to length - after drilling the initial holes, I ran through each one with 2 different sized needles to make the holes large enough for the belaying pins.  I had originally tried to drill the holes with a larger drill bit, but as you saw in the earlier picture, that didn't work too well.
 
 Staining all of the pin rails, as well as some other deck fittings: 
 
Once the stain was dry, I again ran through the holes with the needles to make sure they were still large enough.for the pins.  There are not enough belaying pins to fill all of the holes (presumably the sailors move them as needed), so I put one everywhere the rigging plans said, and then the extras where they looked good.


The kevels and pin rails in place: