Sunday, 20 October 2013

Final Planking

With the stanchions and pre-planking all done, it was time to move on to the final layer of planking.  Unfortunately, this didn't quite turn out as good as I would have liked, especially the port side... on the plus side, I've hopefully learned a few lessons for my next build! 
Note: After my blotchy stain problem on the stern, I had a suggestion on one of the modelling forums to maybe stain the planks first and then attach them.  I seriously thought about doing that, but decided to do the planking (being careful with the glue!) and then stain.  I wasn't sure about bending the wood (before or after the stain?), ensuring all the treenails were lined up, etc. 
The first step was to run one plank along the bottom of the bulwark template; the curve of this plank will ensure the rest of the planks have a smooth curve.
With the first plank in place, I began to work my way up.  I could have done each row as a single strip, but instead I decided to cut them into shorter lengths as that will look better on the final model.  Most of the individual strips were long enough to stretch across 4 bulkheads (about 10 cm), but some were slightly shorter or longer, depending on the particular area being planked.


 Almost done the upper section:
 
The forecastle:
 The stern done:
The entire upper part complete:
The section below the first plank (you can see where I messed up around the 1st gun port): 
 
Laying the first plank on the port side.  As you can see, the curve towards the stern isn't as smooth as the starboard side.  Unfortunately, I didn't quite notice how bad it was until I was a few rows in...
 The finished upper area of the port side:
 At least the bow doesn't look too bad:
 Finishing up the port side:
 
 
Looking like crap... I'm guessing that side will be against the wall... Luckily, there will be a fair bit of trim and the top part will be painted instead of stained, so hopefully the worst of it won't be as noticeable...
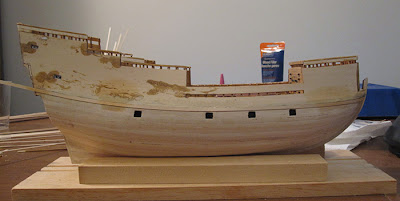
One of the important things was to ensure the bottom run on both sides was even, as there will be a piece across the back which will join them up (the lower wales).  Also, you'll see I did not do the entire hull - adding planking below that last one is optional, and I am still happy with how that first layer turned out...
 With both sides done (and sanded), time to move on to the treenails... 
After all of the treenails were filled, time for more sanding and then used some paint thinner to clean things up a bit and see if there are any glue blotches (hopefully the thinner doesn't cause any problems when I go to stain it - most folks were saying they use mineral spirits, but after some research, thinner is about the same and was referenced on some general woodworking sites as an alternative).  There were a couple of minor glue blotches, but with some sanding I think I got them all.


Ready for staining (almost):
While I procrastinate with the staining, I'm going to move on to preparing the gun port covers (not sure if I'll have them all open or closed - maybe one side of each?), the wales and the trim work, which will probably take a week or so.  The wales need to be bent to the shape of the bow, and then painted black, while some of the trim work needs to be stained (I haven't decided on the colour yet - the instructions say use the same colour as the rest of the hull, but since I'm going with a darker stain for the main planking, I want to use something a bit different) and some needs to be painted (some white, some red, some a red-white pattern and some a green-white pattern).  Oh, and the bottom needs to be painted white, but I haven't decided if I'll do that at this point or a little later after I add the rudder and the beakhead (the front part of the ship) so the white is consistent.
Sunday, 6 October 2013

Stanchions and Pre-Planking

One of the last steps before adding the second layer of planking to the outer hull is adding the stanchions and some pre-planking.  The stanchions are basically upright posts set against the inner hull which act as support for the pre-planking elements.  The pre-planking is made from various strips of wood to add character to the ship, which will be covered over by the final planking.  That will all (hopefully!) make sense as you look through the pictures..
 
The instructions say to attach the stanchions and then stain them, but I decided to stain the strips of wood first to minimize the mess I'd be sure to make if I did it with them attached.  Of course, this means I will need to do some touch up to the tops of each one later on, but I would have to do that anyway because I know I would not be able to get each one cut exactly to the correct length... not to mention I'll be sanding the top of each one into a slight curve later anyway.
 
Most of the stanchions are about 20 mm long, so I calculated how many strips it would take make them all, then just stained them using Puritan Pine (I ended up about 3 stanchions short, so I had to stain another short strip near the end).
Before I started to attach the stanchions , I needed to add the waterways to most of the decks, so I measured all of those and stained them (Ipswich Pine) at the same time.
 
 
 The waterways attached to the various decks:
 
 
I started with the Poop Deck (at the stern of the ship), cutting enough of the stanchions to do both sides.  I also traced the plans to get the placement of each one.
While holding the tracing against the hull, I made little ticks on the waterways to indicate where each stanchion would go.
Then I glued them in place (that sounds simple, but it took a bit of work... I had to cut a slight angle to the bottom of each one, position and hold each one in place while trying not to glue my fingers together...).
Both sides of the Poop Deck done:
  
The template for the Half Deck and Upper (main) Deck:
Template in position:
Almost done one side (I had to use clamps in a couple of spots to ensure the stanchions attached correctly):
Both sides done: 
The template for the Upper Deck and Forecastle Deck:
 
 Both sides of the Upper Deck done:
 
 
 The last 3 stanchions added at the rear of the Poop Deck:
Starting the Forecastle Deck:
 The Forecastle Deck done:
All of the stanchions in place:
 
When adding the stanchions, I noticed I forgot to add the inner strips to one side of the forecastle deck, so I did that now.

 
Before starting the pre-planking, I stained the wood I would be using; the edges that will face out will mostly be covered by the final planking, but the side facing into the ship would need to be stained at some point so I figured I'd do that before attaching the strips.  Two of the forecastle planks will not be covered later, so for those ones I did both sides.
There are 2 different size strips used for the pre-planking (1/8" x 1/16" and 1/16" x 1/16"), as you can see in the pictures below.
 
Adding the pre-planking to the Poop Deck:
Pre-planking the Half Deck:
 
The Forecastle Deck (the bottom of the two strips is a spacer to make sure I got the pre-planking at the correct height.  Surprisingly, I didn't once end up gluing it to the ship by mistake!):
This one actually should have curved slightly to follow the curve of the beakhead, but I couldn't get it... also, I cheated and didn't add the 1/16" x 1/16" strip to the top of it, as the curve of the beakhead would have made the gap too narrow.  If I had been able to curve the pre-planking, this wouldn't have been an issue... I just aligned the top of the plank to the top of the 2 side ones.
 The Forecastle Deck done:
Some inside shots:


After the glue had dried, it was time to trim the stanchions.  At first I tried to use a sharp knife to gently cut them to length, but that didn't turn out too good... I snapped one of them and unglued another... so I pulled out the Dremel and used that to first cut them shorter and then sand them down the rest of the way.


I did have one mishap... I broke the stem... nothing a bit of glue couldn't fix (it looks better than in this picture)...
After I had the stanchions all trimmed to about the right height, I used a flat file to carefully get them the rest of the way and to add the curve to the top of each.


All of the stanchions cut and shaped:
 Lastly, it was time to stain the tops of each one.


As you can probably tell, I also need to do some touch-up to the tops of the pre-planking, but other than that and some additional sanding, the ship is ready for the final layer of planking!
 
I know it is nowhere near the quality of most of the other modeller's ships, but overall I'm happy with how it has turned out so far, and I'm having a good time trying out lots of new techniques!